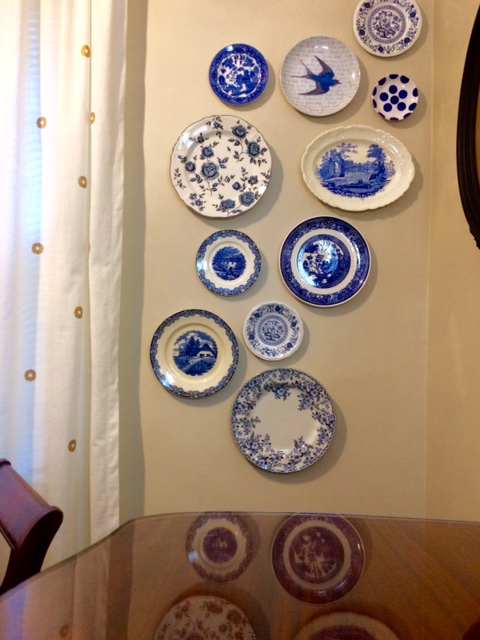
I don’t know what it is about hanging plates on a wall, but it’s something that makes me extremely happy. The first time I can recall seeing such a thing in person was at a diner in Chicago years ago — Elly’s Pancake house on (or near) North Avenue. The focal point of the huge diner was a brightly painted wall (originally green and later red) that was adorned with plates, and I was mesmerized. Maybe it’s because I love food or maybe it’s because I collect dishes (probably a little bit of both), but ever since I frequented that diner with plates all over its walls I’ve been determined to create my own plate wall in my own living space. Now that I have my own house with its own walls to fill and an ever expanding dish collection, the time has come to create my own plate wall. I seem to have gravitated toward a blue and white color scheme for my plate wall, and after months of accumulating the perfect pieces I have created what I like to refer to as my plate wall hall of fame. Almost each plate has a little story about how I came to find it and that’s my favorite part of collecting in general.
Here’s a little tutorial for creating the happiest thing on Earth: a plate wall.
What you need:
– PLATES (I’d suggest selecting a color scheme or theme)
– a second set of hands
– measuring tape
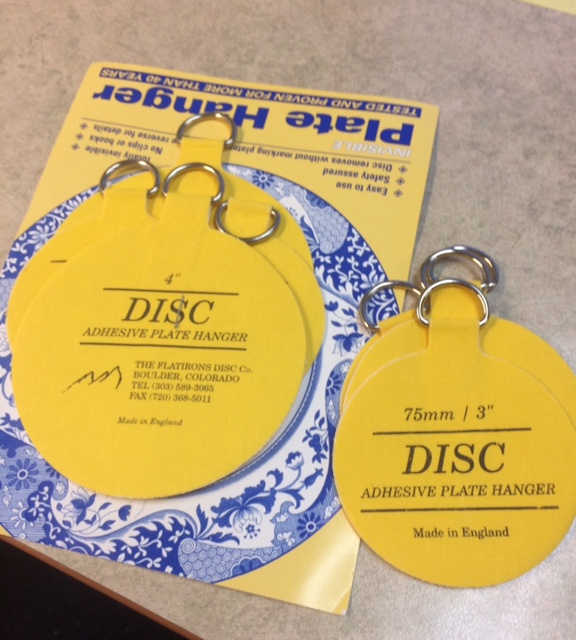
– Flatiron Disc Adhesive plate hangers (pictured below, can be found on Amazon and select craft stores)
– water
– small nails
– hammer
– patience
How to do it:
Start by measuring the backs of your plates (if there’s a raised ring, measure just inside the diameter of the ring) so you know what size(s) plate hangers you’ll need.
Important side note: I started my plate wall with only three plates on the wall. So don’t be afraid you start small while you’re building your collection. Part of the fun is adding more down the road. I will forever be on the hunt for blue and white plates
Once you have your adhesive plate backs, just get the backs of them wet and let stand for a few minutes to allow the glue to get tacky. Being very careful, place the gluey disc onto the back of the plate in the correct, centered or slightly off center in order for the plate to hang on the wall correctly. If there’s a scene on the plate, just keep eyeballing the position of the disc and hold the plate up with the ring on the back right up to the wall while also cradling the plate to make sure it is going to hang correctly and straight. This is where patience comes in. If there’s no scene and just a random pattern on your plates, this part is a breeze. Simply apply the discs to the backs of the plates and press down firmly (think of decoupage), making sure there are no air gaps between the disc and the plate. I had a wet paper towel on standby to wipe off any excess glue that seeped out. I also washed my hands after every plate because my fingers were so sticky with glue and I didn’t want to get the front of the plates tacky. Allow the plates to dry 8 hours to overnight. This is what they’ll look like:

Once the plates are dry (or any time before this step), map out your plate wall. I know some people cut out colored paper pieces in the shapes of their plates after using the plate as a template, but I just don’t have the patience for that. The idea of a plate wall is to be a whimsical mix of plates draped across your wall, so don’t overthink it. This is where the extra set of hands come in. Have someone hold the plates up so you can stand back and look, then mark with a pencil on the wall where the tops and bottoms of the plates will be. Then measure how far down the ring of the disc plate hanger is on the back of the plate, and mark your wall so you know where to hammer in a nail. I worked on two plates at a time and nailed the nails in after I had the positioning right for a couple plates. Then I’d hang the plates and step back and figure out the placement of the next two, and so on. I like the mixture of sizes of plates that I used, and that made it really easy to place the plates. It just sort of came together because I didn’t want the plates lined up in rows. Just remember to erase the pencil marks off your wall!
That’s pretty much it. Also, I selected my dining room for my plate wall because it just seemed so appropriate, but plates look pretty on the wall of any room. A kitchen would also be an obvious choice. Now all that’s left to do is sit and stare at your beautiful plate wall!