Cherry Cobbler

Lately I’ve been inspired by Instagram videos to make desserts and dinners on a budget.  Specifically, there are many online challenges to make an entire meal with ingredients from the Dollar Tree.  Since I try to make dessert for the week every Sunday, I decided to start with a Dollar Tree dessert.  This cobbler couldn’t be easier to make, and for a total of roughly $3.00, I was really surprised by how good it tasted.

I found the cobbler mix and canned cherry pie filling in the grocery aisle of Dollar Tree (both priced at $1.25), and followed the instructions exactly as they were written on the box.  The directions call for 4 tbls of butter and ⅔ cup milk (simple ingredients I always have on hand).  This cobbler is what I consider a true cobbler (with a fluffly, cake like consistency).  It is not a crumble or a crisp.  You could use apple pie filling instead of cherry, and either fruit filling would pair well with vanilla ice cream and the cobbler is best served warm out of the oven or warmed up in the microwave. I would definitely make this again.

Quick & Simple Dinner: 5 Ingredients or Less

IMG_9282
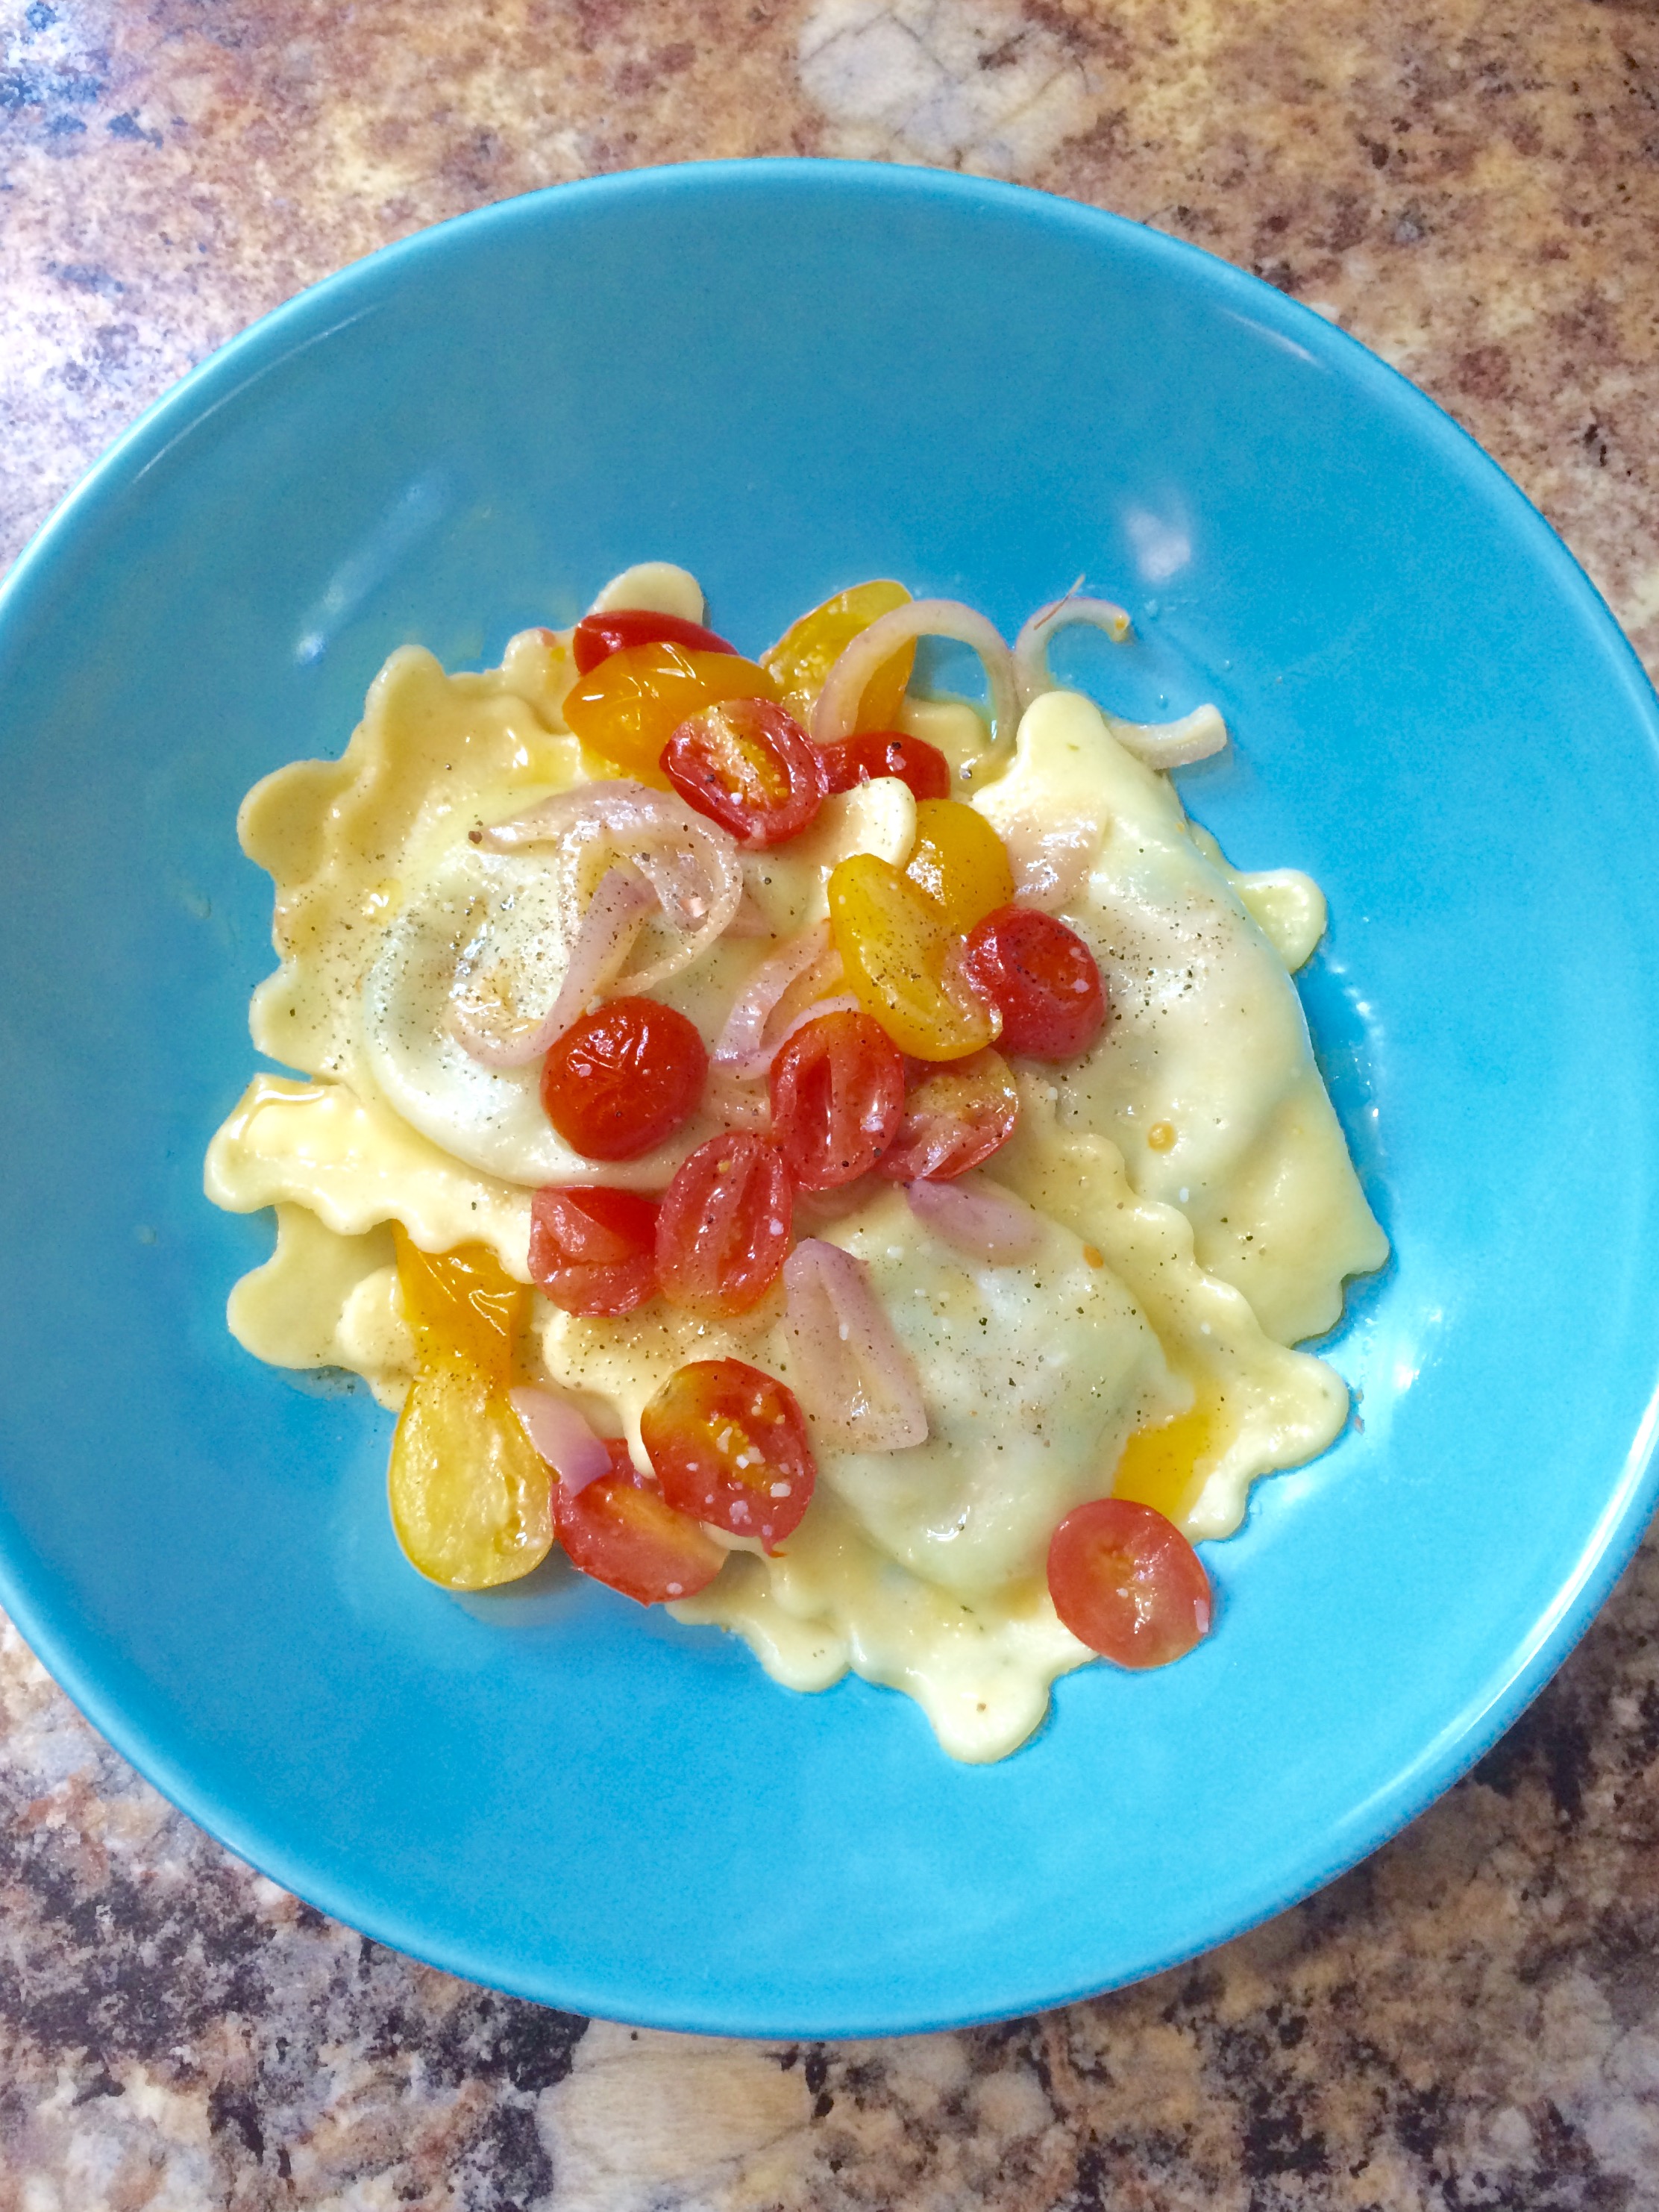
There are some weeks when I just don’t make it to the grocery store for a weekly grocery shop.  If I don’t go on Sunday, there’s a good chance I won’t make it any other day that week.  What makes these weeks particularly interesting at my house is dinnertime.  If I’ve worked all day and haven’t eaten dinner by 6:00 p.m., it’s safe to say I’m pretty hangry.  And this was precisely the case last Thursday.  Starving but not willing to eat fast food, I decided to run to the grocery store that’s one minute away from my house in search of something halfway decent and fast to cook or prepare for dinner.  Without much of a plan in mind I ended up buying a package of fresh spinach and ricotta stuffed ravioli in the dairy section that was on sale.   I figured I’d boil the ravioli and drizzle some olive oil on top and sprinkle with Parmesan cheese.

When I arrived home (hungrier than ever at this point) I realized I had no Parmesan cheese.  I did, however, have fresh grape tomatoes from my garden, shallot and butter.  While the ravioli boiled for 3 minutes, I thinly sliced half a shallot and halved my red and yellow tomatoes.  While the ravioli drained, I melted butter in the same pan I used to boil the ravioli and added the shallot and tomatoes and turned the heat up to medium-high.  I cooked the tomatoes until they were just ready to burst and immediately topped the ravioli with the tomato & shallot mixture and added salt & pepper.  I just realized I should’ve added some fresh basil from my garden as well.  If you have any cheese on hand, it could also be added to the ravioli.

Moral of the story: you can make a decent, fresh dinner for yourself in less than 5 minutes that won’t make you feel bad about yourself simply by being creative with what’s in your fridge.  If you’re like me and enjoy watching Chopped, this made me feel like a contestant on the show and cooking dinner was a lot of fun. Not only was my little ravioli meal delicious, I’ll make it again and add it to my dinner rotation. Let me know if you’d like to see more quick & easy recipes and feel free to post ingredient ideas!

Ingredients:
packaged ravioli
grape tomatoes (any veggie)
Shallot (or onion)
butter (or olive oil)
salt & pepper
optional: fresh basil; Parmesan cheese

IMG_9283

Aldi: Part I

After months of thinking and talking about it, gathering information from my friends and questioning people about their grocery shopping habits, I’ve finally found the time to start writing my ode to Aldi.  Because I have so much to say about this little grocery store, I’ve decided to break it up into three parts (possibly more).  I want to start with the basics, like how to start shopping at Aldi when you’re used to shopping at more traditional grocery stores because that’s the most frequent question I hear when talking to others about grocery shopping at Aldi.  So, I’m going to start out with a short list for Aldi first timers with accompanying explanations for the store itself.

1. Bring a quarter if you want to use a shopping cart:
While the concept of grocery carts holding your quarter hostage for the duration of your shopping trip does come off as odd at first, there is good reason behind it.  Getting that small value back at the end of your shopping trip simply incentives people to put their cart away, instead of leaving it to roam around the parking lot, and eliminates the need and cost of cart corrals and staff to push the carts back into the store.  Everything that seems a little weird at first about Aldi is basically a cost saving technique that enables the store to, in turn, offer lower prices on the food it sells to their customer.

2. Bring your own shopping bags:
Again, Aldi eliminates the cost of plastic and paper bags completely.  They actually have heavy duty plastic shopping bags and old fashioned paper bags without handles available for purchase for mere pennies.  This is actually a pretty interesting concept as Chicago has recently imposed a plastic bag tax at all stores including grocery stores within the city to eliminate plastic bag use.  Aldi was the forerunner of this concept.  Other cities in states like Colorado have city ordinances banning the use of plastic bags at stores altogether.  This is maybe one of my favorite things about Aldi because the benefits are twofold: making people use fewer plastic bags and cutting costs for customers.  You can also reuse empty boxes that are provided by Aldi just as you would at Costco or Sam’s Club to carry your groceries out of the store.

3. Learn the layout of the store:
I have heard some people criticize the layout of the store, but if you think about it, it adheres to the traditional and strategic grocery store layout: milk and dairy in the very back of the store to encourage shopping through the other aisles when you’re running in for a gallon of milk.  I’d suggest just learning the layout of Aldi just like you would any other store you’ve never shopped at before.  The stores are also much smaller than most grocery stores, so it’s really not that difficult to navigate.  The way the food itself is displayed sometimes comes off as weird or off putting to new shoppers, but I just liken it to a Sam’s Club or Costco.  Aldi shelves are stocked the same way warehouse stores are – in the boxes they arrived in, stacked up.  This is another cost saving technique because it reduces the cost of staff stocking the shelves.  If you’ve ever shopped at Costco or Sam’s Club, it’s the same thing.  Get over it.

4. Use your existing shopping list for your first time shopping at Aldi:
I think this is my most important tip.  Disclaimer: Aldi will not have every single item you buy on your typical grocery shopping list.  You have to get used to this fact.  What Aldi does offer is insanely cheaper options for your most basic and regular shopping needs with occasional surprises from week to week.  One of my good friends used her existing grocery list for a family of six and bought whatever she found on the list from Aldi.  Some of the things she bought at Aldi replaced her family favorites, like Greek yogurt and tortilla chips, and other items she decided not change.  The bottom line is that you can buy a dozen eggs for less than .60 cents and a gallon of milk for around or under $1.50.  In 2017, that’s amazing.  Aldi will cut your weekly grocery bill down by allowing you to buy necessities for next to nothing.  The same goes for produce (which is always extremely fresh, by the way).  As a single person who likes to cook, I love being able to buy celery for under $1.00 that I need only a few stalks of for a particular recipe.  If I don’t end up eating the remainder, I don’t feel terrible throwing it away.  I buy all of my cheese at Aldi for recipes and for snacking and that saves me a ton of money.

5. Be prepared for fast and friendly customer service:
I suppose I can only speak for my local Aldi, but the store I go to has the friendliest staff who are also the worlds fastest check out clerks.  I don’t know if it’s a part of the Aldi culture at my particular store, or something that’s actually trained at each store, but sometimes I can’t get my debit card out of my wallet before the clerk is done scanning all of my items and that is invaluable to me.  Checking out at Aldi, even when there’s a line, is still faster than any self check out at a traditional grocery store.  If you had a problem finding anything during your shopping trip, the clerk will call someone on a radio and have them fetch the item for you and promptly bring it up to the register.  If you have a problem or are unsatisfied with anything you bought at Aldi, bring it back for a free replacement.  I’ve never experienced this personally, but have witnessed shoppers come in with an open package of food they had a problem with and the staff replaces the problem item with a new item with no questions asked and a genuine apology.

Aldi may not change your life, but it will change the way you grocery shop (for the better) and will also save you time and money.  I think Part II will be dedicated to those little surprises that can be found at Aldi from week to week.  If you’ve taken the time to read this article and have used any of my tips as an Aldi shopper, please leave comments below about your experience!  Feel free to also include questions you may have about shopping at Aldi that can be answered in subsequent blog posts.

grocery aisle

Plate Wall Hall of Fame

I don’t know what it is about hanging plates on a wall, but it’s something that makes me extremely happy.  The first time I can recall seeing such a thing in person was at a diner in Chicago years ago — Elly’s Pancake house on (or near) North Avenue.  The focal point of the huge diner was a brightly painted wall (originally green and later red) that was adorned with plates, and I was mesmerized.  Maybe it’s because I love food or maybe it’s because I collect dishes (probably a little bit of both), but ever since I frequented that diner with plates all over its walls I’ve been determined to create my own plate wall in my own living space.  Now that I have my own house with its own walls to fill and an ever expanding dish collection, the time has come to create my own plate wall.   I seem to have gravitated toward a blue and white color scheme for my plate wall, and after months of accumulating the perfect pieces I have created what I like to refer to as my plate wall hall of fame.  Almost each plate has a little story about how I came to find it and that’s my favorite part of collecting in general.

Here’s a little tutorial for creating the happiest thing on Earth: a plate wall.

What you need:
– PLATES (I’d suggest selecting a color scheme or theme)
– a second set of hands
– measuring tape
– Flatiron Disc Adhesive plate hangers (pictured below, can be found on Amazon and select craft stores)
– water
– small nails
– hammer
– patience

How to do it:
Start by measuring the backs of your plates (if there’s a raised ring, measure just inside the diameter of the ring) so you know what size(s) plate hangers you’ll need.

plate disc adhesives

Important side note: I started my plate wall with only three plates on the wall.  So don’t be afraid you start small while you’re building your collection. Part of the fun is adding more down the road.  I will forever be on the hunt for blue and white plates  

Once you have your adhesive plate backs, just get the backs of them wet and let stand for a few minutes to allow the glue to get tacky.   Being very careful, place the gluey disc onto the back of the plate in the correct, centered or slightly off center in order for the plate to hang on the wall correctly.  If there’s a scene on the plate, just keep eyeballing the position of the disc and hold the plate up with the ring on the back right up to the wall while also cradling the plate to make sure it is going to hang correctly and straight.  This is where patience comes in.  If there’s no scene and just a random pattern on your plates, this part is a breeze.   Simply apply the discs to the backs of the plates and press down firmly (think of decoupage), making sure there are no air gaps between the disc and the plate.  I had a wet paper towel on standby to wipe off any excess glue that seeped out.  I also washed my hands after every plate because my fingers were so sticky with glue and I didn’t want to get the front of the plates tacky. Allow the plates to dry 8 hours to overnight.  This is what they’ll look like:

plate disc backs

Once the plates are dry (or any time before this step), map out your plate wall. I know some people cut out colored paper pieces in the shapes of their plates after using the plate as a template, but I just don’t have the patience for that. The idea of a plate wall is to be a whimsical mix of plates draped across your wall, so don’t overthink it. This is where the extra set of hands come in. Have someone hold the plates up so you can stand back and look, then mark with a pencil on the wall where the tops and bottoms of the plates will be. Then measure how far down the ring of the disc plate hanger is on the back of the plate, and mark your wall so you know where to hammer in a nail. I worked on two plates at a time and nailed the nails in after I had the positioning right for a couple plates. Then I’d hang the plates and step back and figure out the placement of the next two, and so on. I like the mixture of sizes of plates that I used, and that made it really easy to place the plates. It just sort of came together because I didn’t want the plates lined up in rows. Just remember to erase the pencil marks off your wall!

That’s pretty much it. Also, I selected my dining room for my plate wall because it just seemed so appropriate, but plates look pretty on the wall of any room. A kitchen would also be an obvious choice. Now all that’s left to do is sit and stare at your beautiful plate wall!

plate wall 1plate wall 3


Boxwood Deal

Someone who loves shopping usually also loves finding a good deal.  I have learned that in order to appreciate a good deal, you truly have to love the hunt that leads you to the deal.  Most of my hunting occurs at my local Goodwill store.  Once a skeptic and non-believer, I’m now a fairly recognizable shopper at my local establishment.  I’m still not sure if I should feel proud or uncomfortable about this fact, but all of the employees I chat with at my store are super friendly and helpful.  If they are rolling their eyes at me each time I walk through the doors (typically two to three times a week), they’re at least giving me the courtesy of doing so behind my back.

In the midst of the holiday craziness of the month of December, I still managed to pop into the Goodwill about twice a week.  I will tell you, shopping for deals at the Goodwill requires two things (and they are absolutely mandatory): patience and time (even just a few spare minutes).  I will usually stop into my local store during my lunch hour during the week, just to get a feel for anything new on the shelves.  I always try to know what’s new or old and that helps a lot.  On a random Tuesday visit, all of the Christmas décor was 50% off so I spent a couple extra minutes really scouring that section, just in case, and it paid off.  I found an adorable, mini boxwood wreath for $4.50.  Now, this may seem like a simple little wreath, but the backstory is that I’d been looking for one to hang in my house above my kitchen window ever since I saw a photo of one on Pinterest a couple months ago, and that’s what makes this score so special.  The unexpected twist is that I received a beautiful, custom wreath hanger from a dear friend for Christmas, and since the wreath hanger was so nice I couldn’t imagine hanging it outside.  I have the perfect spot in the interior of my house for a mini boxwood wreath and hanger: a narrow closet door in my living room.


Vintage Kitchen Cart

I’m not sure if it’s the norm for the previous owners of your new house to leave things for you, including handwritten notes and detailed instructions for how things around the house work, etc., so I’m pretty sure I hit the jackpot with my previous owners.  The previous owners of my home did all of the above, and then some, so I felt perfectly welcomed and adjusted in my new place upon moving in.  And, what would probably have been trashed by anyone else has now become one of my favorite pieces in my kitchen: a vintage metal cart.  Found at home stores for around $100.00, I’ve been seeing these metal carts on wheels quite a lot lately, and just couldn’t justify paying that much for one, and luckily I didn’t have to.  In my basement laundry room I found this warped, rusty gem.

The weekend before I moved into my house (when my mom and I did about 15 projects in 2 days), we dusted the rust off the cart with a metal bristled brush, removed the warped and stained wooden top, taped off the wheels and spray painted the cart the most perfect vintage hue of turquoise.  As soon as my dad saw the cart, he announced that he wanted to get a piece of marble or corian to replace the wooden top.  While he works on obtaining that, I’ve simply placed a cute tray atop the cart and it’s working out great.  I currently have the cart filled with Fiesta ware pieces and Mason jars filled with cooking utensils, but I’ll probably swap out what’s in the cart several times each year.  As you can see from the first photo in the post, the cart also works great for granola displays at stores, too. 😉

Supplies Needed:

metal bristled brush
painter’s or masking tape
spray paint ($8 for two cans) – insert color and brand


new-kitchen

Quiche: A fancy way to cook with leftovers

A breakfast and brunch staple, or a sophisticated light dinner, quiche is an extremely versatile meal option that can be quite impressive when serving guests.  Before you get freaked out about the prospect of making homemade crust, don’t worry.  Even I use store bought, pre-made crust from time to time (like when I’m craving chocolate cream pie and only have the energy to make a homemade custard). While the title of this post suggests that my inspiration came from utilizing leftover ingredients in my fridge, it actually came from my chance meeting with some beautiful farm-fresh eggs.  While visiting a friend’s office the other day, someone popped in peddling farm-fresh eggs and I happily bought a dozen brown and tan hued beauties (for only $2, by the way).

I believe the secret to this quiche recipe is the heavy cream in lieu of milk. The heavy cream mixed with the shredded cheese creates such a rich and velvety texture that just can’t be created with plain milk. The beauty of quiche is that you can really add any leftover veggies or meat that you may have on hand. Sausage and peppers the night before for dinner? Add mozzarella cheese and make a quiche for breakfast the next morning! Have fun with it.

Another note is that I always bake my quiche the night before or several hours ahead of serving time. Quiche takes forever to fully cool and set up again, and the flavors come together more overnight or after several hours.

I’ve included my favorite quiche recipe below (from Food Network).

Basic Quiche:

6 eggs
1 1/2 cups heavy cream
1 1/2 cups shredded cheese
salt & pepper
1 (9 in) pie crust (pre-made from refrigerator section is perfectly fine)
2-3 cups veggies and/or meat filling (suggestions below)

Whisk eggs with cream, salt and pepper in a large bowl and stir in cheese and filling. Follow crust directions and place in 9 inch pie dish. Fold edges down and flute the edges of crust. Fill with egg mixture and bake at 375 degrees for 35-45 minutes until the center is just set (you can check the center with a knife to make sure the eggs aren’t runny).

IMPORTANT NOTE: Especially when using a store bought, pre-made crust, cover the quiche with foil after about 20-25 minutes of baking or else the top edges of the crust will burn.

Filling and Flavor Options (I don’t measure the fillings, just eyeball the amounts, but if you’re a stickler for measurements I’d say the meat and veggie ratio should be equal and amount to about 2 cups total):

Bacon & Cheddar
cooked bacon (about 1/2 pound)
sauteed onion (1 small to medium yellow onion, chopped)
cheddar cheese

Ham & Swiss
chopped deli ham
Swiss cheese
sauteed onion (1 small to medium yellow onion, chopped)

Veggie & Cheese
use any leftover veggies you find in your fridge that can be chopped and sauteed, along with sauteed onions (bell peppers, asparagus, broccoli, tomatoes, mushrooms)

Salmon & Dill
If you have any leftover cooked salmon from dinner the night before, shred up a filet or two and add fresh dill and Swiss cheese for a classic breakfast combo.

bacon-and-mush-quiche

Kitchen Before & After

Of all the rooms in my new house, I have to say that my kitchen is my favorite room.  To be fair, a kitchen in any house is probably always my favorite room, but I think my kitchen is especially warm and inviting.  When I first moved in, though, the kitchen was a little too warm for my taste, with a monochromatic color scheme of honey oak cabinets, floors, peach walls and terra cotta trim and yellow tinted light bulbs.  After doing my research online and especially on Pinterest, and summoning my high school art class knowledge of the color wheel, I realized that the overly warm tones of the honey oak woodwork could be easily offset and calmed with a fix as simple as changing the paint color to something from the opposite side of the color wheel.  With two coats of a light grey hue on the walls, and painting the trim white, and changing the light bulbs to “daylight,” my kitchen was transformed.  The honey oak cabinets no longer looked so orangey, and the cool grey color actually made the room look more warm and inviting.  The grey walls made such a difference with the cabinets that some people thought I bought and installed new kitchen cabinets, and I took this feedback as a win!

img_6583

The door to my basement:  As you can see from the photos, at some point my dad and I decided to start peeling paint off one of the doors in the kitchen.  This door is directly across from my backdoor, hence the very first thing I see when I walk into my house.  There were several layers of paint on everything in my house, the doors included, so once we got a spot started, the paint peeled off pretty effortlessly with my fingers.  Although it seemed easy enough, I quickly realized this was not a weekend project I could finish on my own, and should probably be completed by a professional.  So I called my furniture refinished (yes, I have a “guy” who refinishes furniture) and asked him if he’d be interested in stripping a door for me.  Of course, he said, and I dropped the door off a couple of weeks later.  By the end of the weekend, and a couple of phone calls later, my refinisher decided to leave the panels of the door painted white, and I think the door turned out beautifully.  I couldn’t be happier with my custom, original door.  Now I want to strip every door in my house, of course.

kitchen-door

Framed flour bags:  I bought a handful of old flour bags from a local mill at a garage sale almost four years ago for $2/piece, and after finding the perfect frames for them had them hanging up above my bed in my apartment.  The kitchen is a much more appropriate setting for the flour bags, and the colors couldn’t be more perfect for the space.  I love the way the three frames look stacked on the narrow wall.

new-kitchen

Turquoise kitchen cart:  There’s a story behind this adorable cart that warrants its own post, so check back soon for the story!

Cranberry Sauce

Why do I love cranberry sauce?  Let me count the reasons why.  It’s tart, it’s fresh, it’s festive and bright, and can be used a million different ways.  While I always make homemade cranberry sauce for Thanksgiving, this year’s batch was particularly special because I made it for both my family’s Thanksgiving and the “friendsgiving” dinner I hosted for the seven lovely members of my euchre club.  The sauce was such a hit with my friends that I even took the time to write out the recipe and instructions in a lengthy group email that included all of the Thanksgiving recipes I prepared for the dinner.  And, one friend’s gracious compliment of making every single recipe for her family’s Thanksgiving is, in part, what inspired me to revamp my blog and share my recipes with more people.

Some may find cranberry sauce to be just another traditional side dish on the Thanksgiving table, but the recipe I’ve used for years has a subtle spiciness and a hint of citrus that makes it stand out among everything else on the table.  I’ve included the original Rachael Ray recipe below along with many ideas of how to use cranberry sauce for more than just an accompaniment to turkey.  Especially during the holidays, cranberry sauce is great to have on hand for last minute appetizers and desserts.  I had a small get together at my house the night of Christmas, and guess what I had on hand?  Cranberry Sauce!  I used it for cheese and crackers and as a topping for plain cheesecake that was sitting in my fridge.  Next year I might even jar up the cranberry sauce and give it away as gifts!

What I used:
1 cup water
1 cup sugar
1 cinnamon stick
2 teaspoons finely chopped fresh ginger (I use 1 teas dried, ground ginger b/c I always have it on hand)
2 teaspoons orange zest
1/4 teaspoon salt
1/8 teaspoon ground cloves
1 (12 oz) bag fresh cranberries

Optional:  2 rosemary sprigs (removed shortly after adding the fresh cranberries)

How I made it:
In a medium saucepan, combine 1 cup water with the sugar, cinnamon stick, ginger, orange peel, salt and cloves. Cook over medium heat, stirring constantly, until the sugar is dissolved. Stir in the cranberries (I usually remove the cinnamon stick at this point, but you can leave it in until the very end for a stronger flavor) and bring to a boil, then lower the heat and simmer, stirring, until slightly thickened, about 8 minutes.

Transfer the mixture to a bowl and remove the cinnamon stick. Let cool.

My favorite uses for cranberry sauce:

  • served atop a cracker and a slice of white cheddar cheese
  • as a spread on a turkey sandwich
  • mixed with vanilla yogurt, topped with granola
  • as a topping over plain cheesecake

The Time I Tried on a Blue Apron

For the longest time, I was very curious about mail order meal services.  As someone who cooks a lot, and almost always cooks for one, I find that I often waste ingredients that I’ve bought for one, specific recipe and don’t seem to find a second use for.  I decided to try out Blue Apron, and before I knew it a box of food arrived at my office.

What I liked about the service: all of the ingredients were provided for three full recipes (and I mean everything, including an individually and adorably packaged egg in one case) and when possible, already measured out.  The only prep work involved was cutting vegetables, which made the preparation time very short, especially compared to my normal prep time when cooking a full meal for myself.  I really appreciated only having one or two celery stalks (for example) for a recipe that called for one or two celery stalks, as opposed to having a huge bundle of celery sit in my fridge that I’d probably never use again.

As an avid cook, I also appreciated the opportunity to try out different ingredients that I may have been nervous to try on my own, in small amounts, without left overs.  For me, the portions for “two adults” were perfect for just me, even if I ended up eating the second portion for lunch the next day.  To be honest, most of the meals that were intended for two people could be eaten by one person, or as a one and a half sized portion.  If I actually served the meals to both myself and one other person, I don’t think there would have been enough food to fill us up.  I really enjoyed most of the recipes I tried over a two month period, and I have saved a few of the recipe cards and have made one of the recipes for a side dish a couple of times on my own.

The instructions and recipes were very easy to follow, and I noticed that using a service like Blue Apron would be a good idea for someone who was interested in learning how to cook.  Along with the recipes, the instructions included with the meals taught basic cooking techniques.  Utilizing the website, further and more detailed techniques were also included for each recipe.

What I didn’t like about the service:  It was actually difficult for me to schedule the meal delivery from week to week.  It sounds simple enough, but because the food was delivered on a Wednesday, I found that by mid-week, I usually had plans for the evenings and couldn’t dedicate those nights to cooking the fresh food that was in my fridge.  Several times when I tried to go online and change my delivery or skip a week, the deadline had passed and I received food I didn’t have time to cook, resulting in my original problem of wasting food.  I did make a point to use any meat that was delivered, but some of the veggies didn’t make it.

The boxes of food are well packaged, and very well insulated to keep the meat cold and usually still frozen, but this also made for an extremely heavy box of food to haul into my car and back into my house from work.  I also found myself feeling weird about throwing away the ice packs.

Another aspect of the service is the cost.  For my first order I received a special introductory price of $39.99 for three meals for two people, and then the regular pricing was $59.99 for the same amount of food.  For me, $20 meals at home are on the high end.  While I have been known to spare no expense for certain ingredients, those are usually for special occasions or for recipes that yield a large amount and create days of leftover meals.  Obviously, the main thing you are paying for is the convenience of having ingredients prepped and measured for you while still being able to prepare homemade food at home, but for me, in the end, I cancelled the service and have actually been making more of an effort to use one ingredient for multiple recipes whenever I can.  To me, part of the fun of cooking is being inventive with food and creating recipes out of whatever I have on hand.

Pictured is one of my favorite recipes from the Blue Apron experience, that actually yielded two perfect portions that I shared with a friend: Lemon Chicken and Green Beans.